Showing posts with label vegetables. Show all posts

Friday

Palm Springs: Part I

Hello everyone!!

Soooo, it turns out that 22 days is a loooooong time to be on vacation and out of my usual routine. But I'd be lying if I said that I didn't adjust well. I am very lucky to have a job where I can take so much time off!

California was beautiful and my remaining time off back here at home, in Minnesota, was nice also. We ended up cranking out some nice weather and you can feel Spring in the air! I almost started my herb seedlings garden, but decided to hold off until this weekend. **Yes, I do plan to blog about my seedling garden and indoor herb garden!**

Now, onto why we're really here ... FOOOOD!

We didn't do as much cooking as I'd honestly hoped or planned on and I was horrible at taking pictures of everything. So ultimately what we have here are instructions on what we made and pictures of the final results, for most everything. One of the recipes (Stuffed Peppers) I am still waiting for the details on from my friend. So please keep checking back for that!


First things first ...

Bloody Mary Bar & Nosh


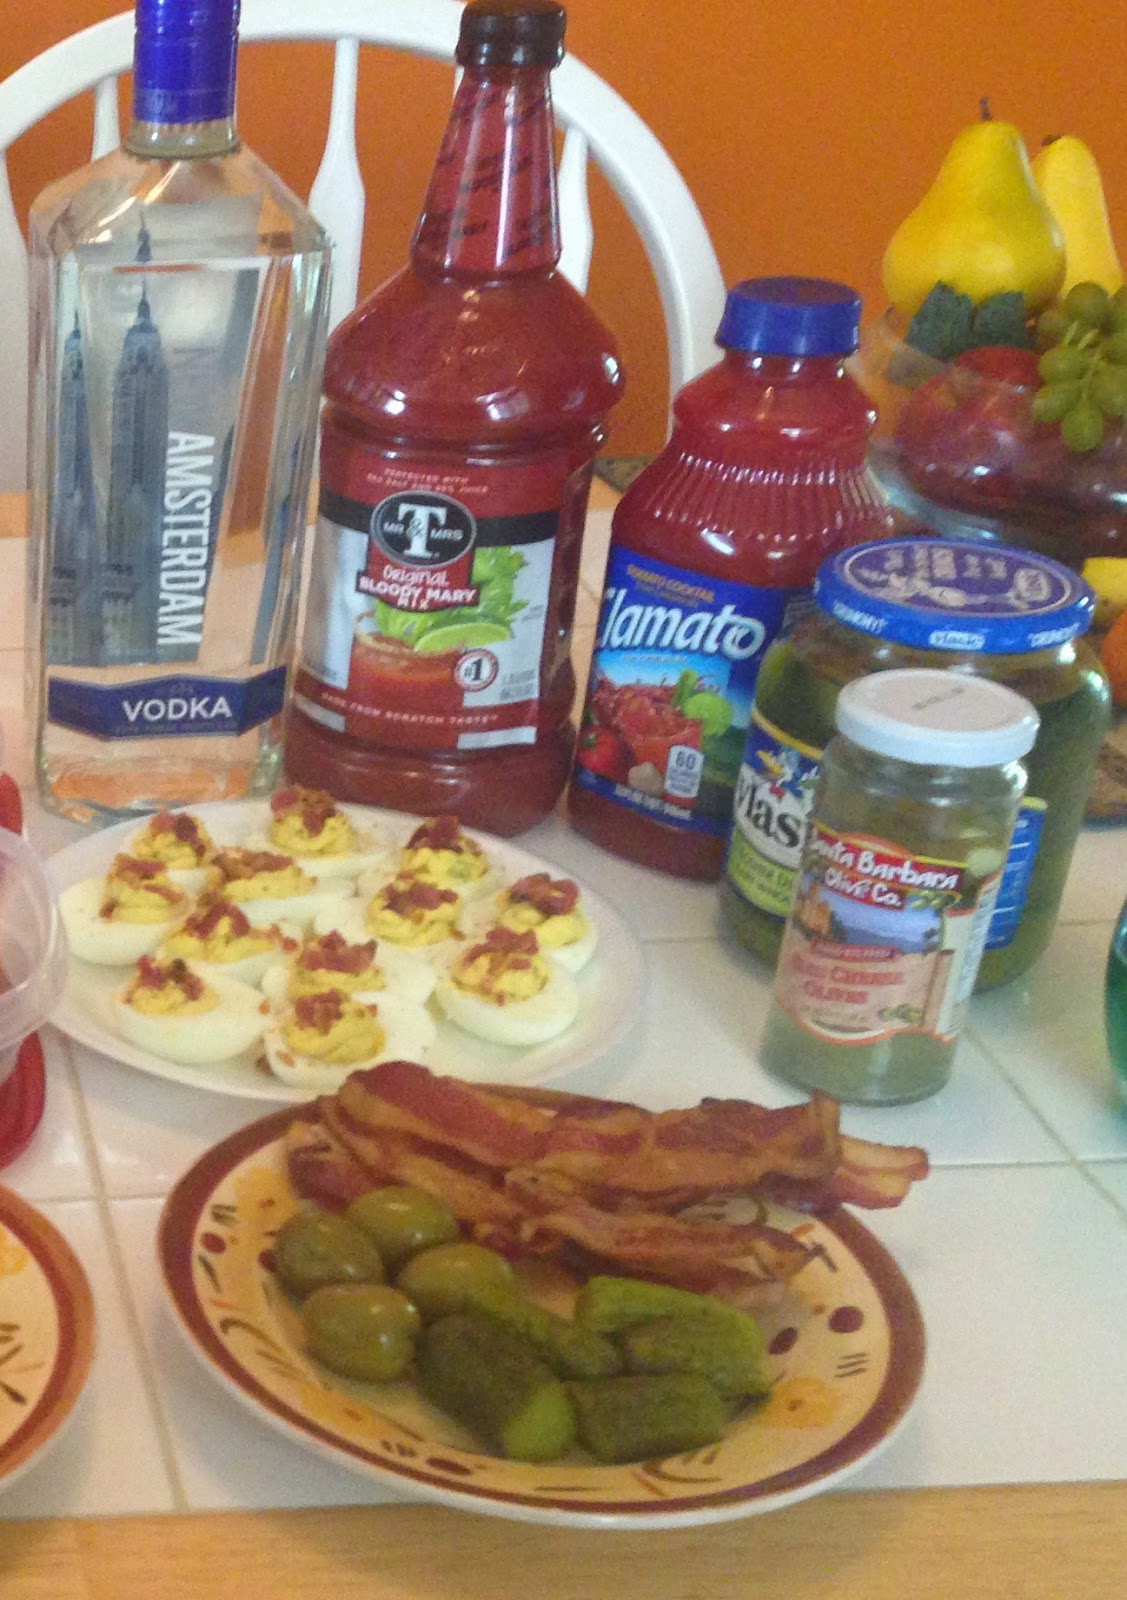
This is my Blood Mary Bar!! And it was intense! Aaaand somewhat difficult to maintain in a house full of 8 people so I did change up the nosh menu often. I would basically just use leftovers from stuff we'd eaten for snacks and lunch to replace some of the random things you see here, but we obviously had the essentials at all times. 


The items you see in the Bloody Mary Bar pictured above are ...
  • Cold Homemade Leftover Pizza Bites
  • Grilled Johnsonville Cheddarwursts
  • Swiss Cheese bites wrapped in Turkey
  • Extra Sharp Cheddar
  • Extra Spicy Pepperjack
  • Blue Cheese Stuffed Dates wrapped in Bacon
  • Deviled Eggs w/ Bacon Sprinkles
  • Bacon Strips
  • Blue Cheese Stuffed Olives
  • Dill Pickles
  • ...and then the obvious (Salt, Pepper, A1 Steak Sauce, Hot Sauce, Climato, etc)


*Please, excuse the quality of these pictures - I literally cropped and zoomed in on these from the original.

For My Deviled Eggs I kind of just winged this one. (I had never made these, so I had asked my boyfriend what he does to his amazing Deviled Eggs and then I just kind of went off on my own with that). So for those I used ...
  • Mustard
  • Mayonnaise
  • Diced up Pickles
  • Paprika
  • Bacon Sprinkles
I used 6 hard boiled eggs, cut them in half and removed the hardened yolk. With my yolk mixture I added about 2 Tablespoons of mustard, 1 Tablespoon of Mayonnaise, 1 large pickle very finely diced and then I sprinkled Paprika and some left over bacon crumbles on the top. If the consistency doesn't look right, just add more Mustard & Mayonnaise, as you see fit.


For my Blue Cheese Stuffed Dates wrapped in Bacon I went off a recipe from Pinterest, but these are about as basic as you can get. I had tried these delicious little buggers at Devil's Advocate in Downtown Minneapolis. We had a Groupon for breakfast and bloodies and this was on a hot skewer! I took one bite and had no idea what it was, so I pulled our server aside and I barely got the words out of my mouth to ask what this delicious little thing was and he knew immediately I was asking about the dates. Trust me, just try them, you won't regret it!

So for these I used ...


  • Bacon
  • Pitted Dates (I got mine in a package and already pitted, found in the baking aisle)
  • Blue Cheese Crumbles


The building process of these is pretty simple! You want to take your bacon slices and cut them evenly in half. Cut open your date down the long side. Stuff some blue cheese crumbles inside and then wrap them closed with the slice of bacon. I suggest setting them on your baking sheet with the fold side down so that the bacon starts to stick to itself during the cooking process. 


Voila!!

The rest of the Bloody Mary Bar is pretty self explanatory and you can really get creative with it. I've seen Bloody Mary Bars where there are all sorts of different pickled vegetables. I once found some pickled baby corn at Target (Market Pantry Brand) and they are really tasty! And if you've ever pickled before you know there are many different things you can pickle! I like to try different types of cheeses and meats on mine.


I'll post Part II ASAP, and we'll take a look at a few of the things we made for dinner!

Here's a sneak peek!! ....


Until next time!


Crista


Tuesday

Turkey Breakfast Sausage Egg Scramble

Breakfast has got to be, hands down, my favorite meal of the day! Not just because it's the first meal of the day, but the foods that fall in to the average breakfast pyramid ... YES!!!

First of all, I LOVE eggs. I love eggs by themselves, on a sandwich, with just toast on the side or even hard boiled as a snack during the day. Then you have french toast, pancakes, hash browns, fruit, sausage ... and lets not forget BACON! Besides you non-meat eaters, who doesn't love bacon!!?

When I am trying to eat healthier, I like to make my breakfast big (portion speaking), low calorie and high in protein. This is so I have that full feeling well in to the latter part of my day. I work 11:30-9:30 p.m., so my morning routine usually consists of the gym or a jog around 8 a.m. and then I come home, make a fruit/protein shake and shower. Then I prepare my breakfast and lunch/dinner for the day. So I usually am not actually eating my "breakfast" until about 11:30 when I sit down at my console. So that meal has to get me through until 5:00/6:00 p.m. at best.

Two other things I love just as much as eggs, if not more is Turkey Sausage and Avocado. They're both healthy fats and high in protein foods that I never feel guilty eating. So with that being said, what I'm going to share with you this morning is ...


Turkey Breakfast Sausage Egg Scramble


This is super easy and quick to make! I cooked the Turkey Breakfast Sausage on my "Sunday" and stored it in some tupperware in the refrigerator. Turkey sausage is super easy to make and it's much like beef, in that your just brown it until the pink disappears. There's instructions on the packaging as well. 


Then the morning of I sauté my veggies. This time around I chose to use red pepper, onion and mushrooms. And after those have softened a little and the mushrooms are giving off moisture you can add your eggs. I use egg substitute or egg whites because it's easy to just pour it from the carton and there's less calories and fat! 


After the eggs have cooked I just throw the egg and vegetable mixture in to a pyrex dish, add about 1/3 cup of Turkey Breakfast Sausage and a 1/2 an Avocado and throw it in my lunch box! You can alter this recipe in many different ways by adding a different kind of vegetable or even throwing some cheese on it. I personally like to add some hot sauce to mine! It's a really versatile dish that can be fine tuned to your liking. 


Here's the breakdown of ingredients and cooking instructions ... 


Turkey Breakfast Sausage Egg Scramble

Prep Time: <5 Min  Cook Time: 5 Min  Servings: 1


Ingredients

1/3 Cup             Jennie-O Turkey Breakfast Sausage (cooked)
3/4 Cup             Egg Substitue (equals about 3 normal eggs)
1/2                     Avocado
1/8 Cup             Onion (Your choice on color - really any kind is good!)
1/8 Cup             Red Pepper
1/8 Cup             Mushrooms (sliced)


Instructions

First you want to brown your Turkey Breakfast Sausage until you see no more pink, or follow the packaging instructions and check the internal temperature with a thermometer. 

Then sauté your vegetables on Low-Medium heat in a small non-stick 10" skillet for about 4-5 minutes or until softened. Add your eggs at that time and continue to cook on Low-Medium heat for another 5 minutes or until your eggs no longer look wet. Add this mixture to whatever dish you plan to eat it from. 

Add your meat and avocado, and enjoy! 


Nutrition Information --->  Total Calories: 443  Fat: 28g  Protein: 33g

_____________________________________________________________________________


I hope you enjoy this quick breakfast as much as I do! I would love to hear from you and what you did differently or how it turned out using my method! Please comment below or shoot me an email. I would love to hear from you!!

Until next time, 


Crista


Thursday

Broiled Brown Sugar & Soy Sauce Glazed Salmon w/ Fried Rice

Yay! I get to share my first recipe!! And, this is one of my favorites too!

I make this often because it's easy and I love salmon! The fried rice is probably not the best for you if you're watching your caloric intake, but I choose to pick my battles some days.

I like to cook meals for the work week ahead of time. Often I will do this on my Sunday, and I'm usually cooking at night. At this time of the day I find that I'm not as hungry and I'm less likely to snack on what I'm cooking. My mind also tends to unwind when cooking and I feel like I get a little "me" time in.

This meal will last me two days and it's very filling, so it counts as my "late lunch early dinner" meal and I usually just snack on some fruits and veggies throughout the day on top of this and the breakfast I likely had earlier that day.


Broiled Brown Sugar & Soy Sauce Glazed Salmon w/ Fried Rice


I like to make small variations to this recipe, based on what veggies I'm planning to add to the rice. This time I went pretty low key and just added in some left over frozen peas and carrots that I had on hand. In the past I've added things such as mushrooms, broccoli, asparagus or water chestnuts. **Trader Joe's sells what they call a 'Harvest Hodgepodge' .... 


... and this is a GREAT addition to your fried rice if you are a Trader Joe's shopper!** I wouldn't suggest adding much more than 2 cups of vegetables though.


I made my marinade/glaze first, using sesame oil, soy sauce and brown sugar. I usually just pour all of my ingredients in to a sandwich or freezer baggie (depending on how much meat I'm marinading) and then add the meat in. This time I had approximately 10 ounces of salmon and just cut it in half.


While that sits in the fridge for approximately 20-30 minutes I make my rice! I like to use Rice-a-Roni's Fried Rice because it's quick and easy to make. I have yet to make my own fried rice, and I will someday, but this will suffice just fine for now.


When I'm done with the rice, I ration it out 50/50, which usually turns out to be about 2 cups/serving. 
**Just remember (if your counting calories and logging your food) you added 1 1/2 - 2 cups of veggies, so realistically, you're meal contains 3/4 - 1 cup of veggies and approximately 1 1/4 cups rice.**


Now, for your salmon. This doesn't take long if you are going to broil it. Max 10-15 minutes! I like to flip my portions halfway through so all the glaze hardens and cooks on both sides of the fish. but you certainly don't have to do this. It will cook through within 15 minutes. 

I use a piece of tin foil (easy clean up) on a cookie sheet and fold all four sides of it up to create a little nest for my salmon. I like to pour all of the leftover marinade/glaze on the foil so it just permeates into my pieces of salmon while it cooks!


Here's the breakdown of ingredients and cooking instructions ....


Broiled Brown Sugar & Soy Sauce Glazed Salmon w/ Fried Rice

Prep Time: 5 Min or Less   Cook Time: 30 Minute Total (Rice & Fish)   Servings: 2

Ingredients

10oz                    Fresh Alaskan Salmon
1 Box                   Rice-a-Roni Fried Rice
2 Cups                Water
2 Tbsp                 Butter or Margarine
1 1/2-2 Cups         Vegetables (Frozen or fresh & slightly saute'd)
2 Tbsp                 Brown Sugar
3 Tbsp                 Sesame Oil
3 Tbsp                 Soy Sauce


Instructions

Combine your sesame oil, soy sauce and brown sugar in a sandwich bag, making sure the brown sugar dissolves in the liquids. Then add your salmon to the sandwich bag, seal it tight and place in the fridge for approximately 20-30 minutes. 

Using 2 tablespoons of butter in a non-stick skillet, add your rice and vermicelli from the Rice-a-Roni box. You're butter will start to melt, as this happens mix the rice and vermicelli so that the melted butter is coating everything. Continue to do this until your vermicelli starts to brown. Once brown, while stirring, slowly add 2 cups of water and the provided package of seasoning. Bring to a boil, turn heat down, cover and let simmer for approximately 15 minutes or until rice is tender. Just before your rice is deemed tender, add your vegetables** and turn the head down to low for approximately 2-3 minutes.

On a cooking sheet, place your salmon (and the remaining juices of your marinade if you'd like) on a piece of tinfoil. Place cooking sheet under a pre-heated broiler (medium/high setting). Cook for a total time of 10-15 minutes, or until the salmon is easily flaked. I recommend turning the piece of salmon over halfway through cook time so both sides get charred and the glaze bakes in to the piece of salmon. 


**If you're using frozen vegetables, running warm water over them so they thaw a little is recommended**
**If you're using fresh vegetables, saute them in a separate skillet while your rice is simmering**

And if you like a little heat, my favorite hot sauce to add to this is some good old Sriracha!

Nutrition Information ---> Total Calories: 690   Fat: 20g   Protein: 50g

_________________________________________________________________________________


Like I mentioned before, this isn't the most nutritious meal out there. But I sure think it's delicious and I hope you enjoy it as much as I do! So if you do decide to make it, I would love to hear from you and how it turned out, and what you thought. Post a comment or send me an email! 


Thanks for letting me share!

Crista